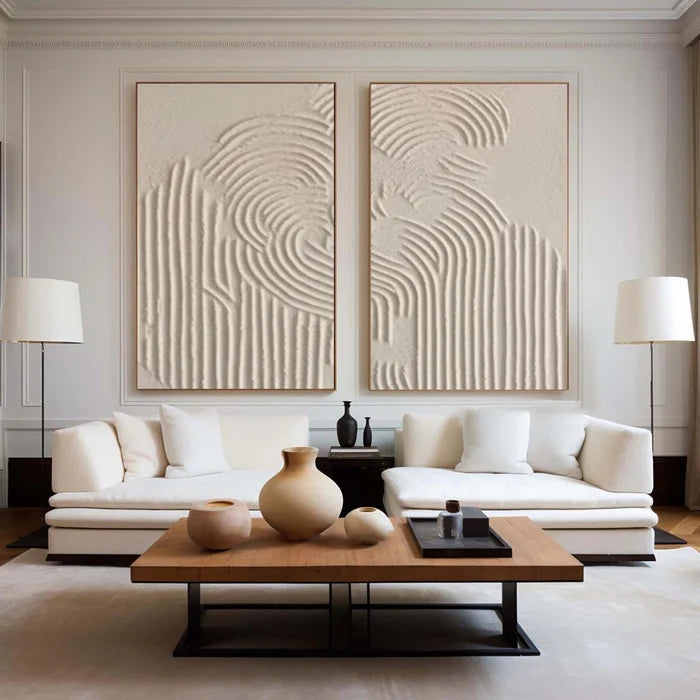
Wabi-Sabi Wall Art for Beginners: How to Style Your First Piece
Styling your first wabi-sabi piece takes three steps: choose a piece in the room's earthy palette and scale, place it where the room already rests, and style around it with restraint. Each step is simple on its own, and together they turn a first purchase into a room that feels finished rather than decorated.
Step 1: Choosing Your First Piece
Start with the palette, not the pattern. A wabi-sabi piece sits in the room's own material family — clay, linen, stone, sand, or wood tones — so it belongs from the first day. Choose visible texture over flat print, because the texture is what carries the style, and let the scale follow the wall rather than the room.
For a first piece, the safest choice is one textured painting in a muted earthy tone, sized to the furniture beneath it — roughly two-thirds of a sofa or bed width. The size guide covers the proportions for common walls and furniture, and the wabi-sabi art collection shows the range of first-piece options.
Palette before pattern is the rule that prevents the most returns. A piece chosen for its texture and muted tones will hold almost any calm room; a piece chosen for a striking pattern commits the room to that pattern. If the room has no clear material family yet, start from the floor or the largest textile, and let the art follow it. Texture depth is the second decision: a low-relief surface is the beginner-safe default, while deep sculptural relief works where a bolder statement is welcome.
Step 2: Placement and Height
Place the piece where the room already pauses: above the sofa, above a bed headboard, or on the first wall you see. Center it near the eye-level band, and for furniture-anchored walls leave a clear gap between the frame and the furniture so the two read as one unit. Mark the outline with painter's tape and live with it for a day before committing.
Placement is a two-step decision: which wall, then what height. The wall comes first because it decides the height — a sofa wall centers at eye level from the sofa, an entry wall at eye level from the door, and a narrow wall at the height that fills it best.
If the wall is narrow, a vertical format adds height; if it is long, a set of three quiet pieces reads as one composition. The placement rule is the same in every case: one focal wall, one piece or one set, and nothing competing in the same sight line.
The furniture line matters as much as the height. The art should sit comfortably within the furniture's width — roughly two-thirds for a sofa or bed — and the gap below should be consistent, so the eye moves from furniture to art without a jump. A piece that is too small floats, and a piece that is too wide crowds; the tape test settles both before any holes are made.
Step 3: Styling Around the Art
The styling around the piece is where the style is won or lost. Keep the surface beneath it mostly clear — a low console, one vase, a lamp — and let the art be the strongest object in the composition. Pull the palette from the piece into the room with one or two accents: a cushion in the same sand tone, a clay pot, a linen throw.
Light does the finishing work. Angle a lamp so the light grazes the textured surface, and the piece will look different in the morning than in the evening. Texture without side light reads as flat pattern, so placement and light are as important as the art itself.
Repetition keeps the styling coherent: the sand tone in the art appears once in a cushion, the wood tone in the frame appears once in a shelf or table. One or two repetitions is enough — the room reads as designed when the eye finds the same family twice, and it reads as busy when every object introduces something new. Restraint after the first two accents is the beginner's best habit.
Three Beginner Mistakes
| Mistake | Why it hurts | The fix |
|---|---|---|
| Choosing pattern before palette | The piece clashes with the room | Start with the room's material tones |
| Hanging too high or too small | The piece floats or gets lost | Size to the furniture; use the tape test |
| Crowding the wall around the art | The calm turns to clutter | One focal wall, one piece, quiet surroundings |
The pattern behind all three is rushing: choosing a piece before the room's palette, hanging before measuring, styling before the art is placed. Slow the process and each step gets easier.
Two habits prevent the rush. First, live with the tape outline for a day before ordering or hanging — scale errors are the most common first-piece regret. Second, choose between two pieces by the quieter option: a muted textured piece will hold the room longer, and it is easier to make a quiet piece feel stronger with light than to calm a loud one. The one-week test applies after hanging: if the piece still feels right after a week of evenings, it was the right choice.
Vinchy Art Studio Recommendation
In the Vinchy Art studio, first pieces are chosen by palette first and pattern second. The studio recommends one textured painting in the room's material family, sized to the furniture, placed at eye level, and lit by a lamp at an angle. If you are unsure between two pieces, choose the quieter one — it will hold the room longer, and the preview step confirms the surface before it ships. The same three-step order applies to any wall, and each completed wall makes the next one easier. For the DIY route, the beginner's guide to creating wabi-sabi art at home covers the making side, and the wabi-sabi art blog post explains the style's background.
The three steps also work as a review routine: before any purchase, run the palette check, the scale check, and the placement check in order. A piece that passes all three belongs in the room; a piece that fails one is the wrong piece, however much you like it. The routine is what keeps a first collection calm.
Conclusion
Your first wabi-sabi piece works when the three steps are done in order: choose in the room's earthy palette and scale, place where the room already rests, and style with restraint and side light. The piece marks the calm; the palette, placement, and lighting make it real. Start with one wall, one piece, and one lamp, and the room does the rest.
The one-week test applies after hanging: if the piece still feels right after a week of evenings — morning light, lamp light, a few ordinary days — it was the right choice. If it feels wrong, the fix is usually placement or light, not a different piece. The first wabi-sabi piece teaches the eye faster than any reading.
First-Piece Checklist
- Palette taken from the room's materials
- Texture chosen over flat print
- Scale sized to the furniture beneath it
- Placed at eye level with the tape test
- One lamp angled to reveal the texture
- Surrounding objects restrained
FAQ
How do I choose my first wabi-sabi piece?
Start with the room's earthy palette, choose visible texture over flat print, and size the piece to the furniture beneath it. The size guide covers common proportions, the tape test settles the scale before ordering, and if two pieces compete, the quieter one is the safer choice.
Where should a first piece go?
Where the room already pauses: above the sofa, above the bed, or on the first wall you see — one focal wall with nothing competing in the same sight line. The tape test confirms the position before any holes are made, and the same wall will host the next piece if the collection grows.
Do I need to change the room before adding wabi-sabi art?
No. The art can lead: choose the palette from the piece, add one or two accents in the same tones, and let a lamp do the lighting work — the wall itself usually needs only a quiet color.
How high should wabi-sabi art hang?
Center it near the eye-level band, and above furniture leave a clear gap between the frame and the furniture, consistent on both sides. The tape test settles the exact height and checks the view from the doorway.
Can I make wabi-sabi art instead of buying it?
Yes. The beginner's guide to creating wabi-sabi art at home covers the DIY route; buying a studio piece adds verified materials, consistency, and preview before shipping — and both routes teach the same eye for palette and placement.
Shop Beginner-Friendly Wabi-Sabi
Shop the wabi-sabi collection above at Vinchy Art for hand-painted, made-to-order first pieces — muted earthy palettes, visible texture, custom sizes, and preview before shipping.